Summertime

20140617_131904

Summer vacation. It’s been nearly two weeks, and we’re getting into a bit of a routine.

20140617_115539

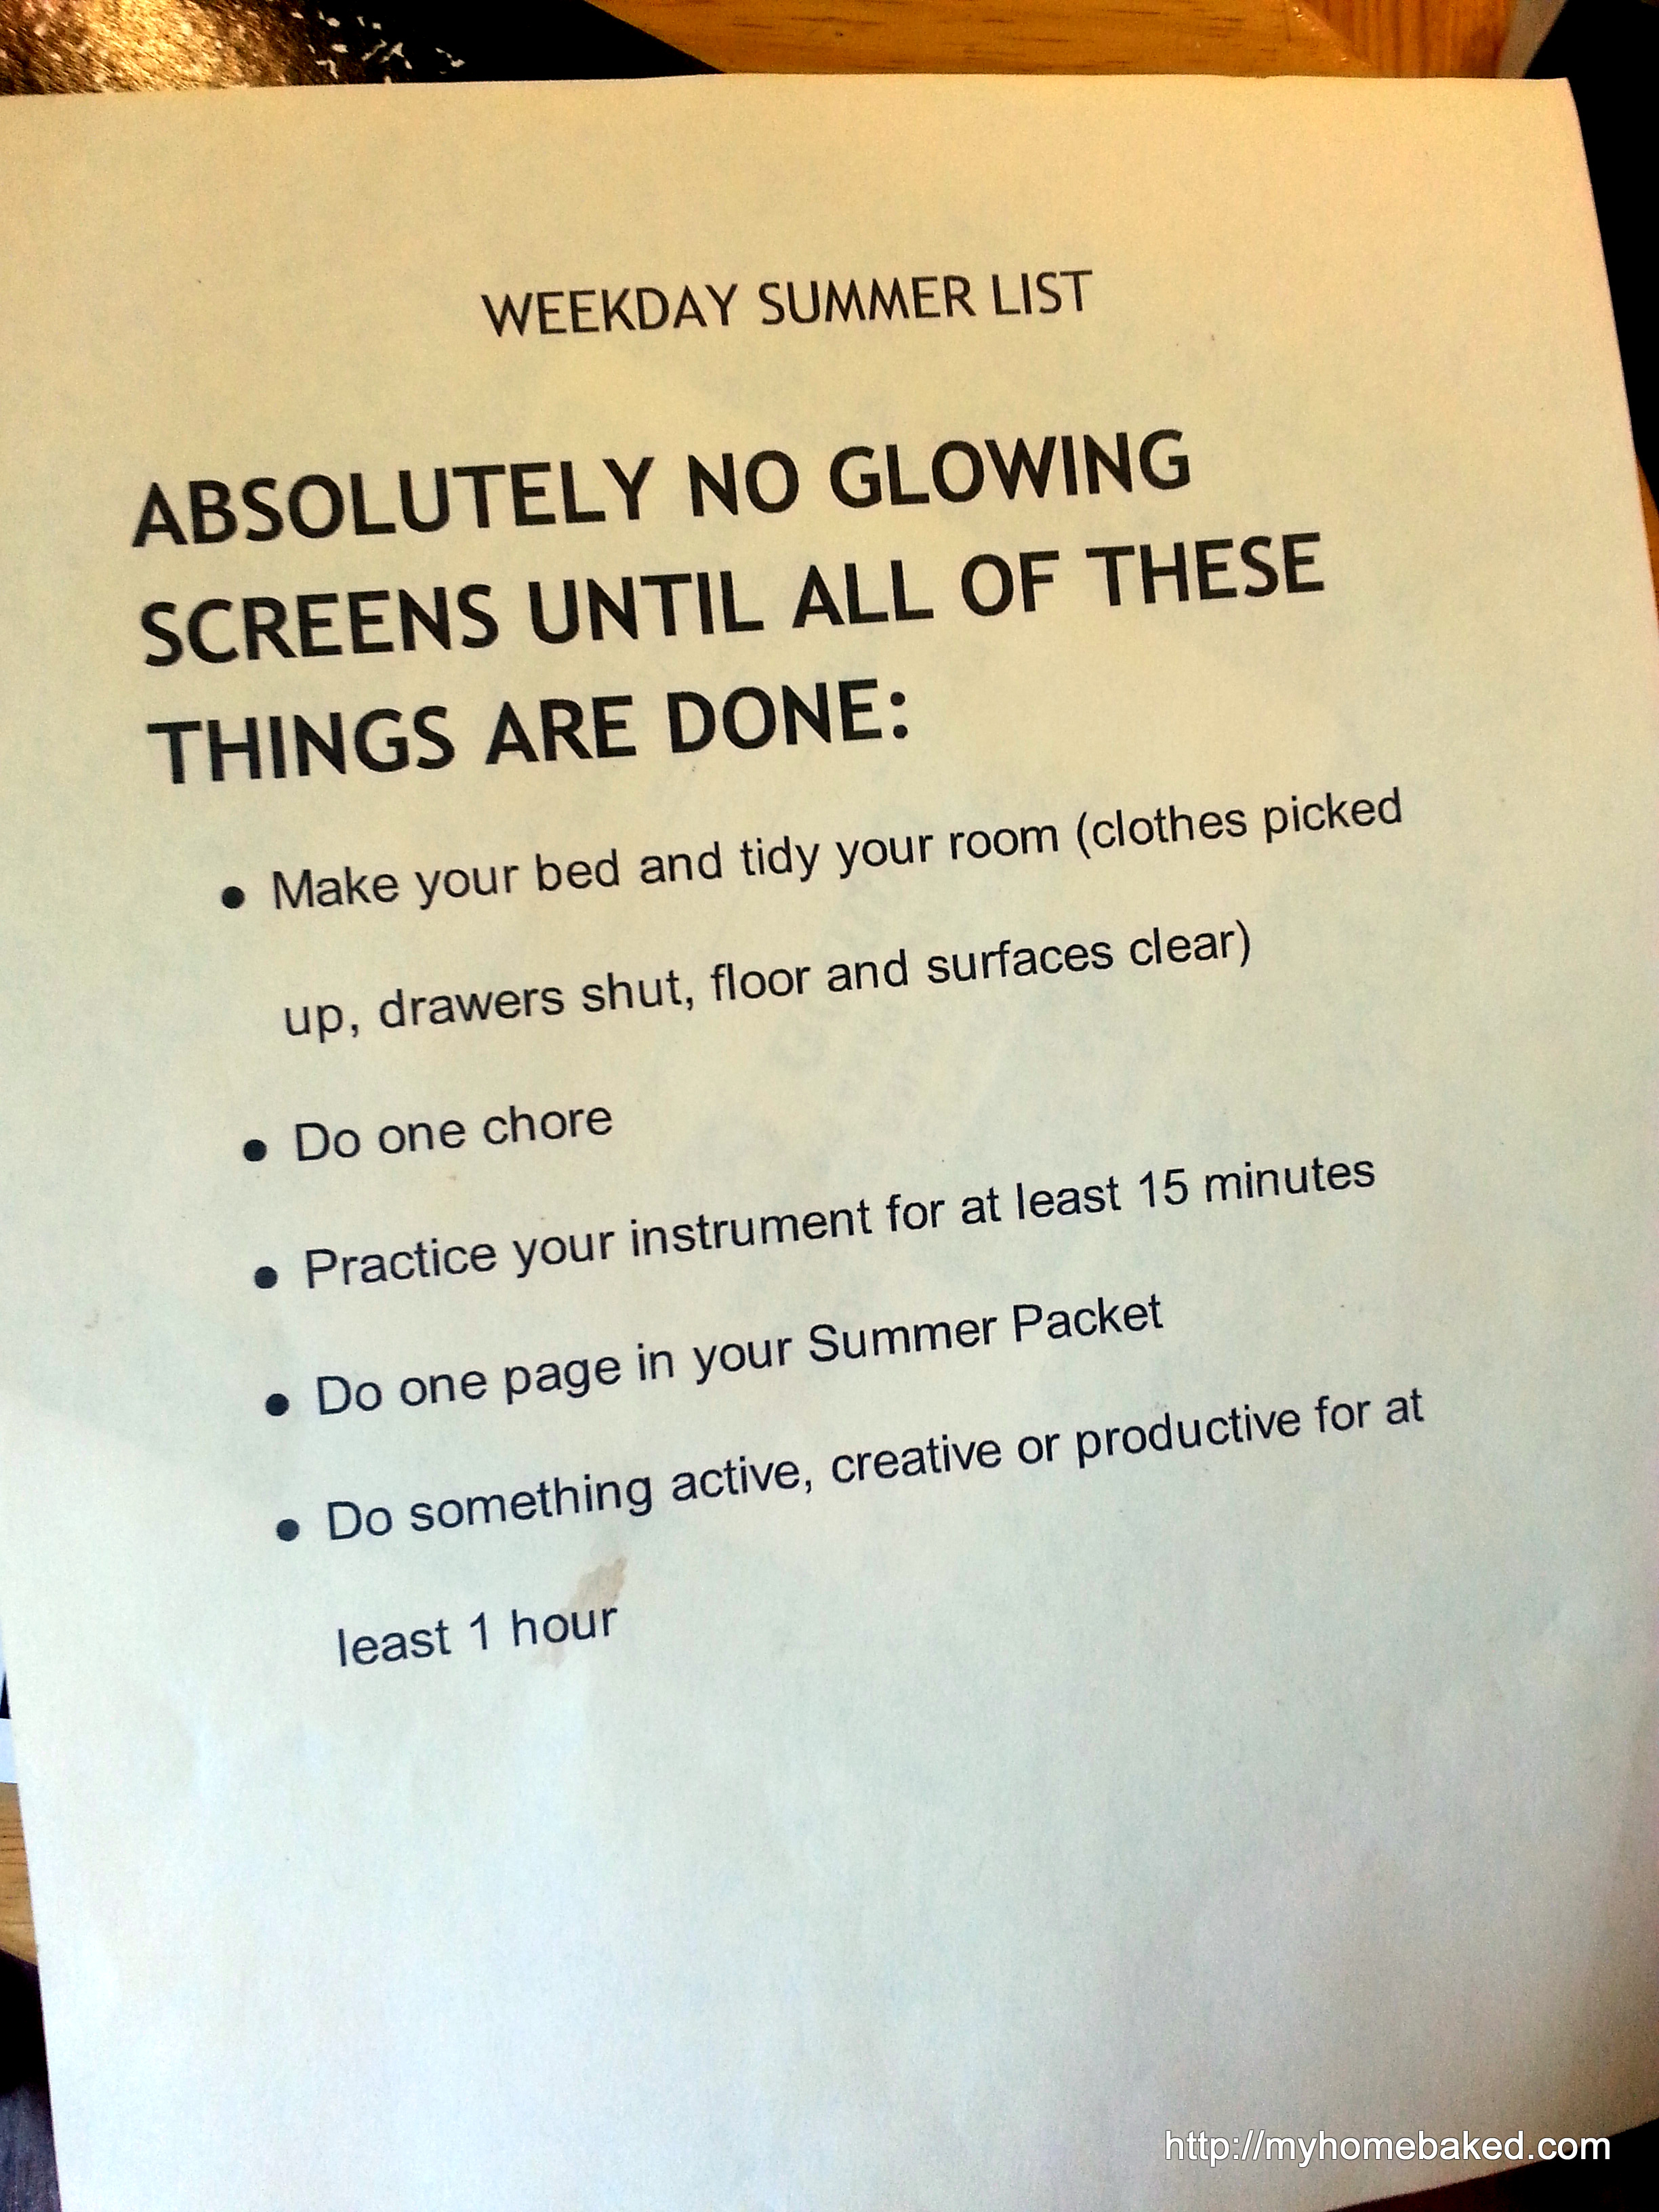
So far, the best thing I did was to make a list for the kids of five things that must be accomplished each weekday before spending time with tv/computer/iPod/video games (I borrowed the idea from another blog and adapted it for our own needs–thanks for the link, Lina!). It’s working well for the two older kids, especially, because their screen time is limited only by how long it takes them to finish the list (and how much we’re at home–it’s the rare day that doesn’t have a scheduled activity or three).

Little Six needs some guidance to get through the list, but he is doing it. I’m happier because I’m not nagging them to help out, and they seem to like choosing what daily chore they do (though I’m happy to make suggestions if they consult me). They are practicing their instruments daily and doing their summer math packets without my intervention. (Usually. Today Mr. Eleven reached a section where he needs some guidance, and I am proving unequal to 7th grade math. With the help of Google, we are learning it together.)

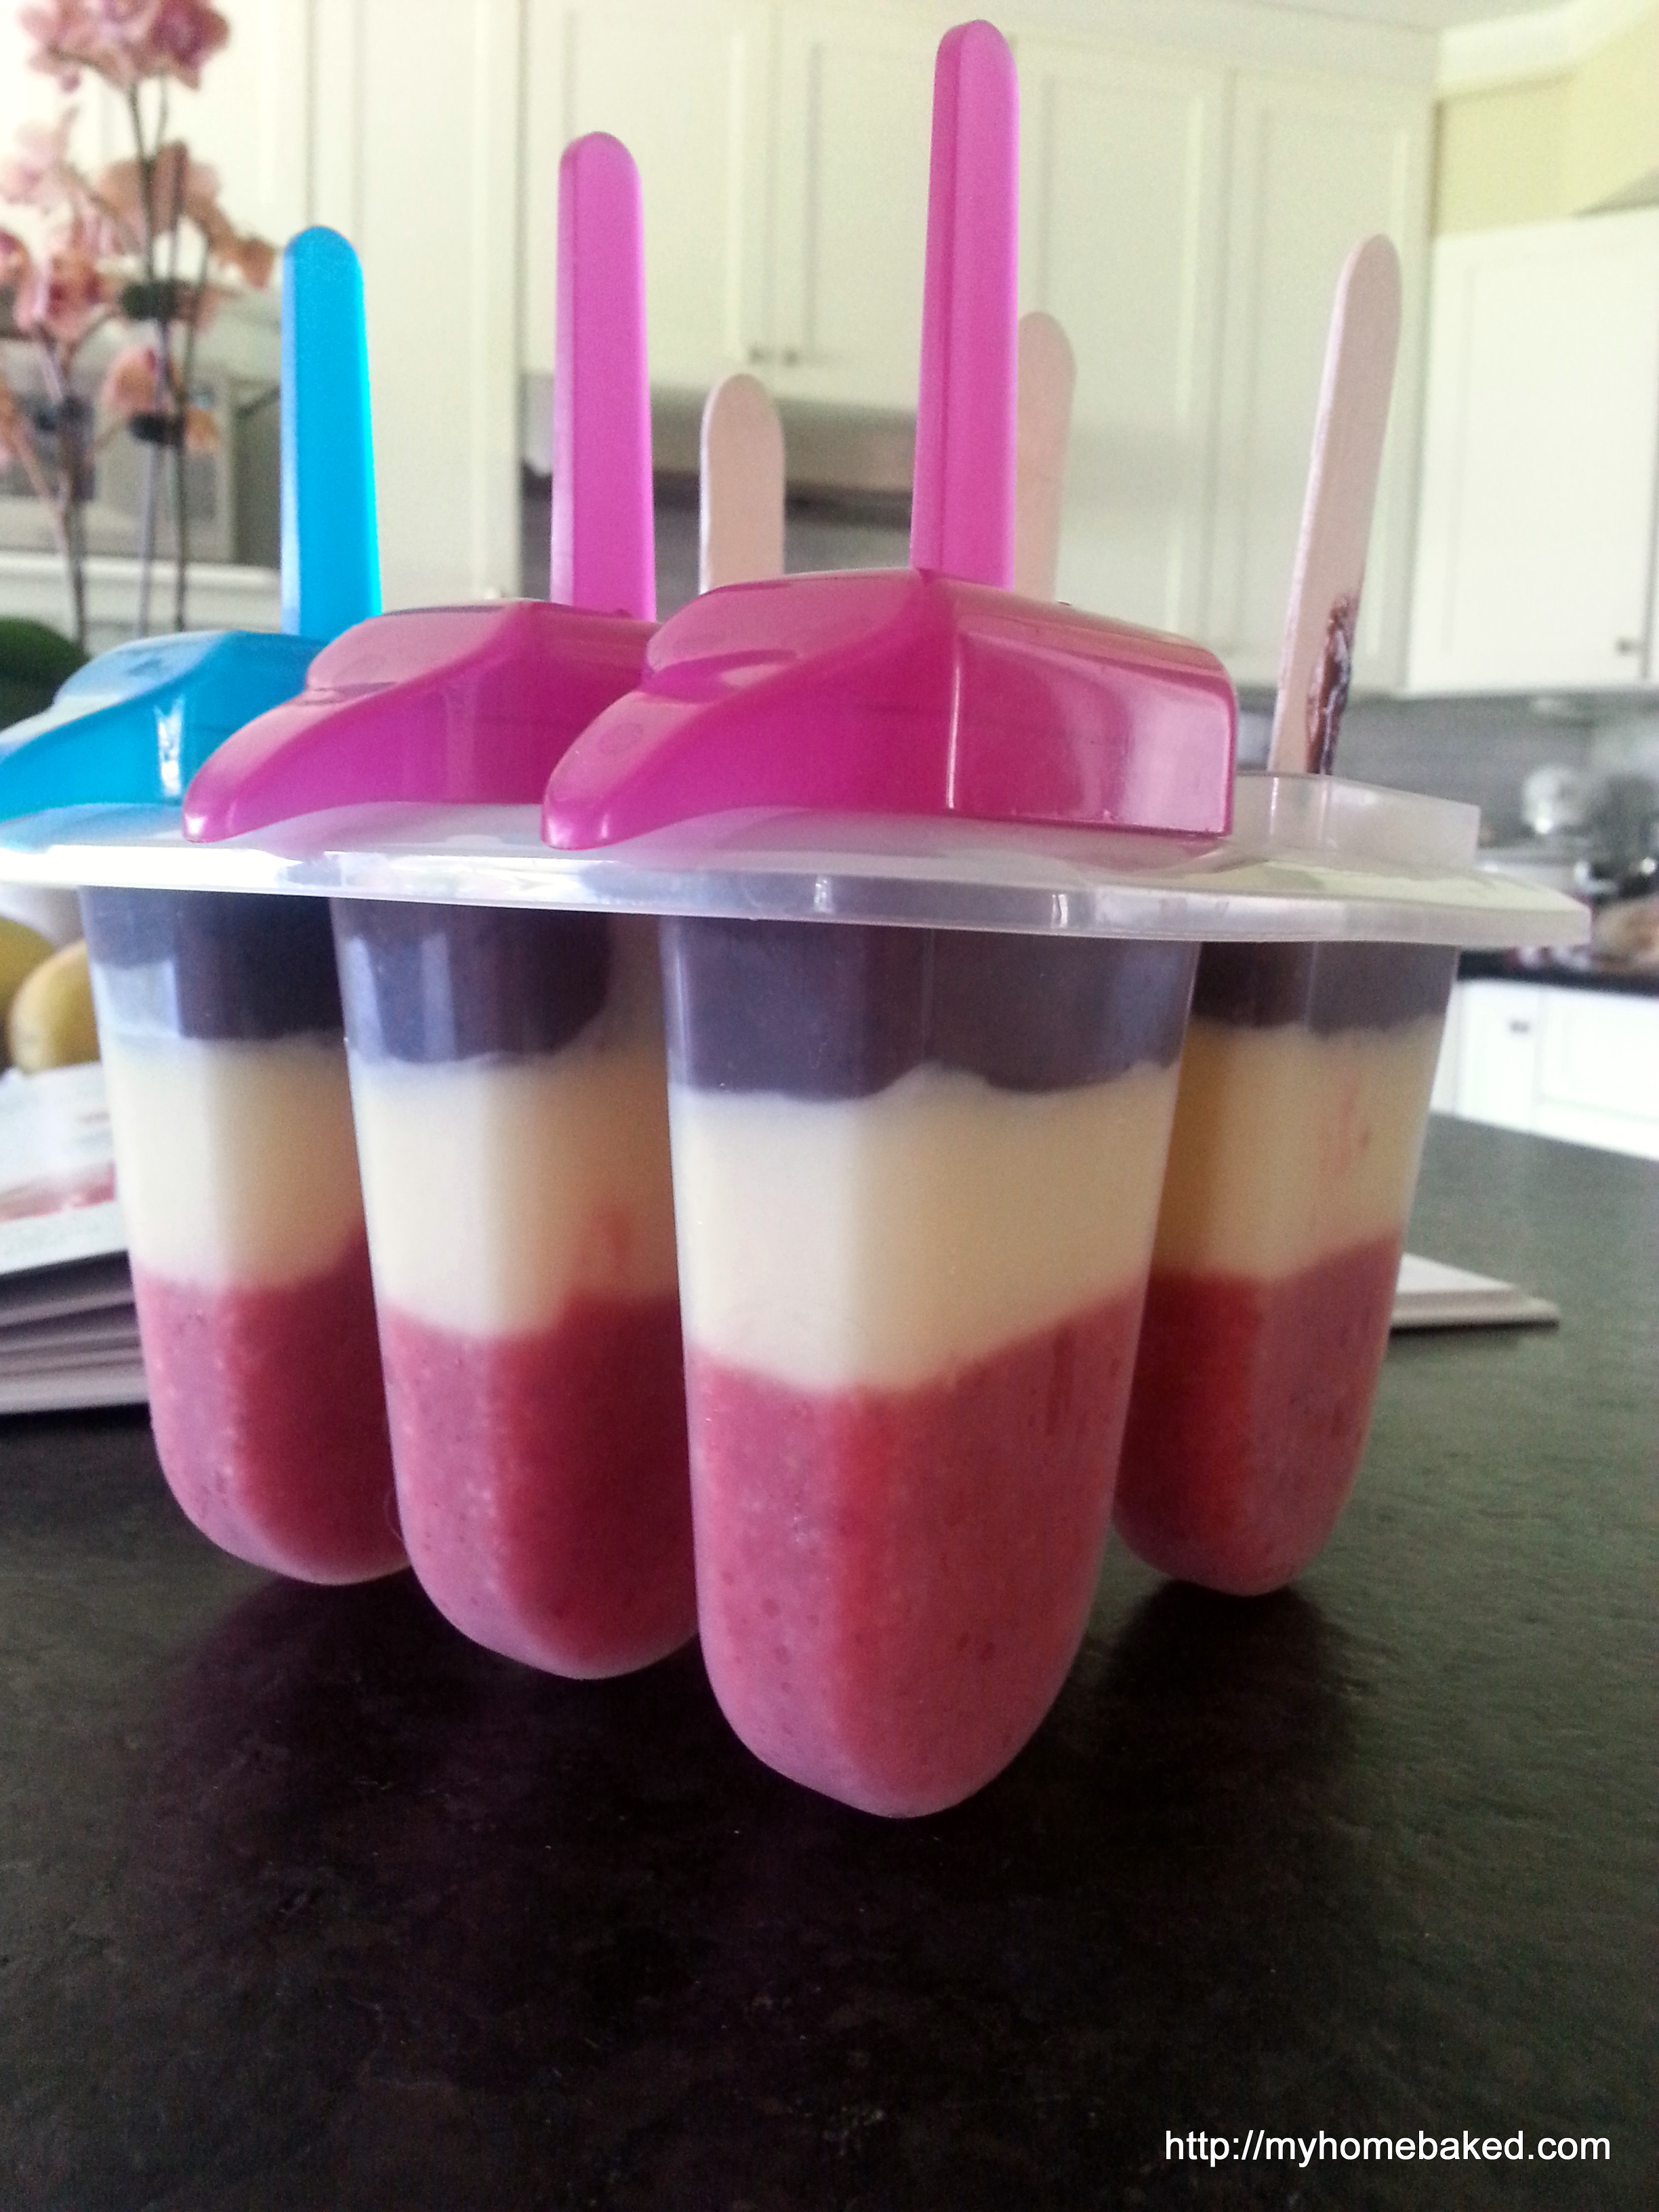
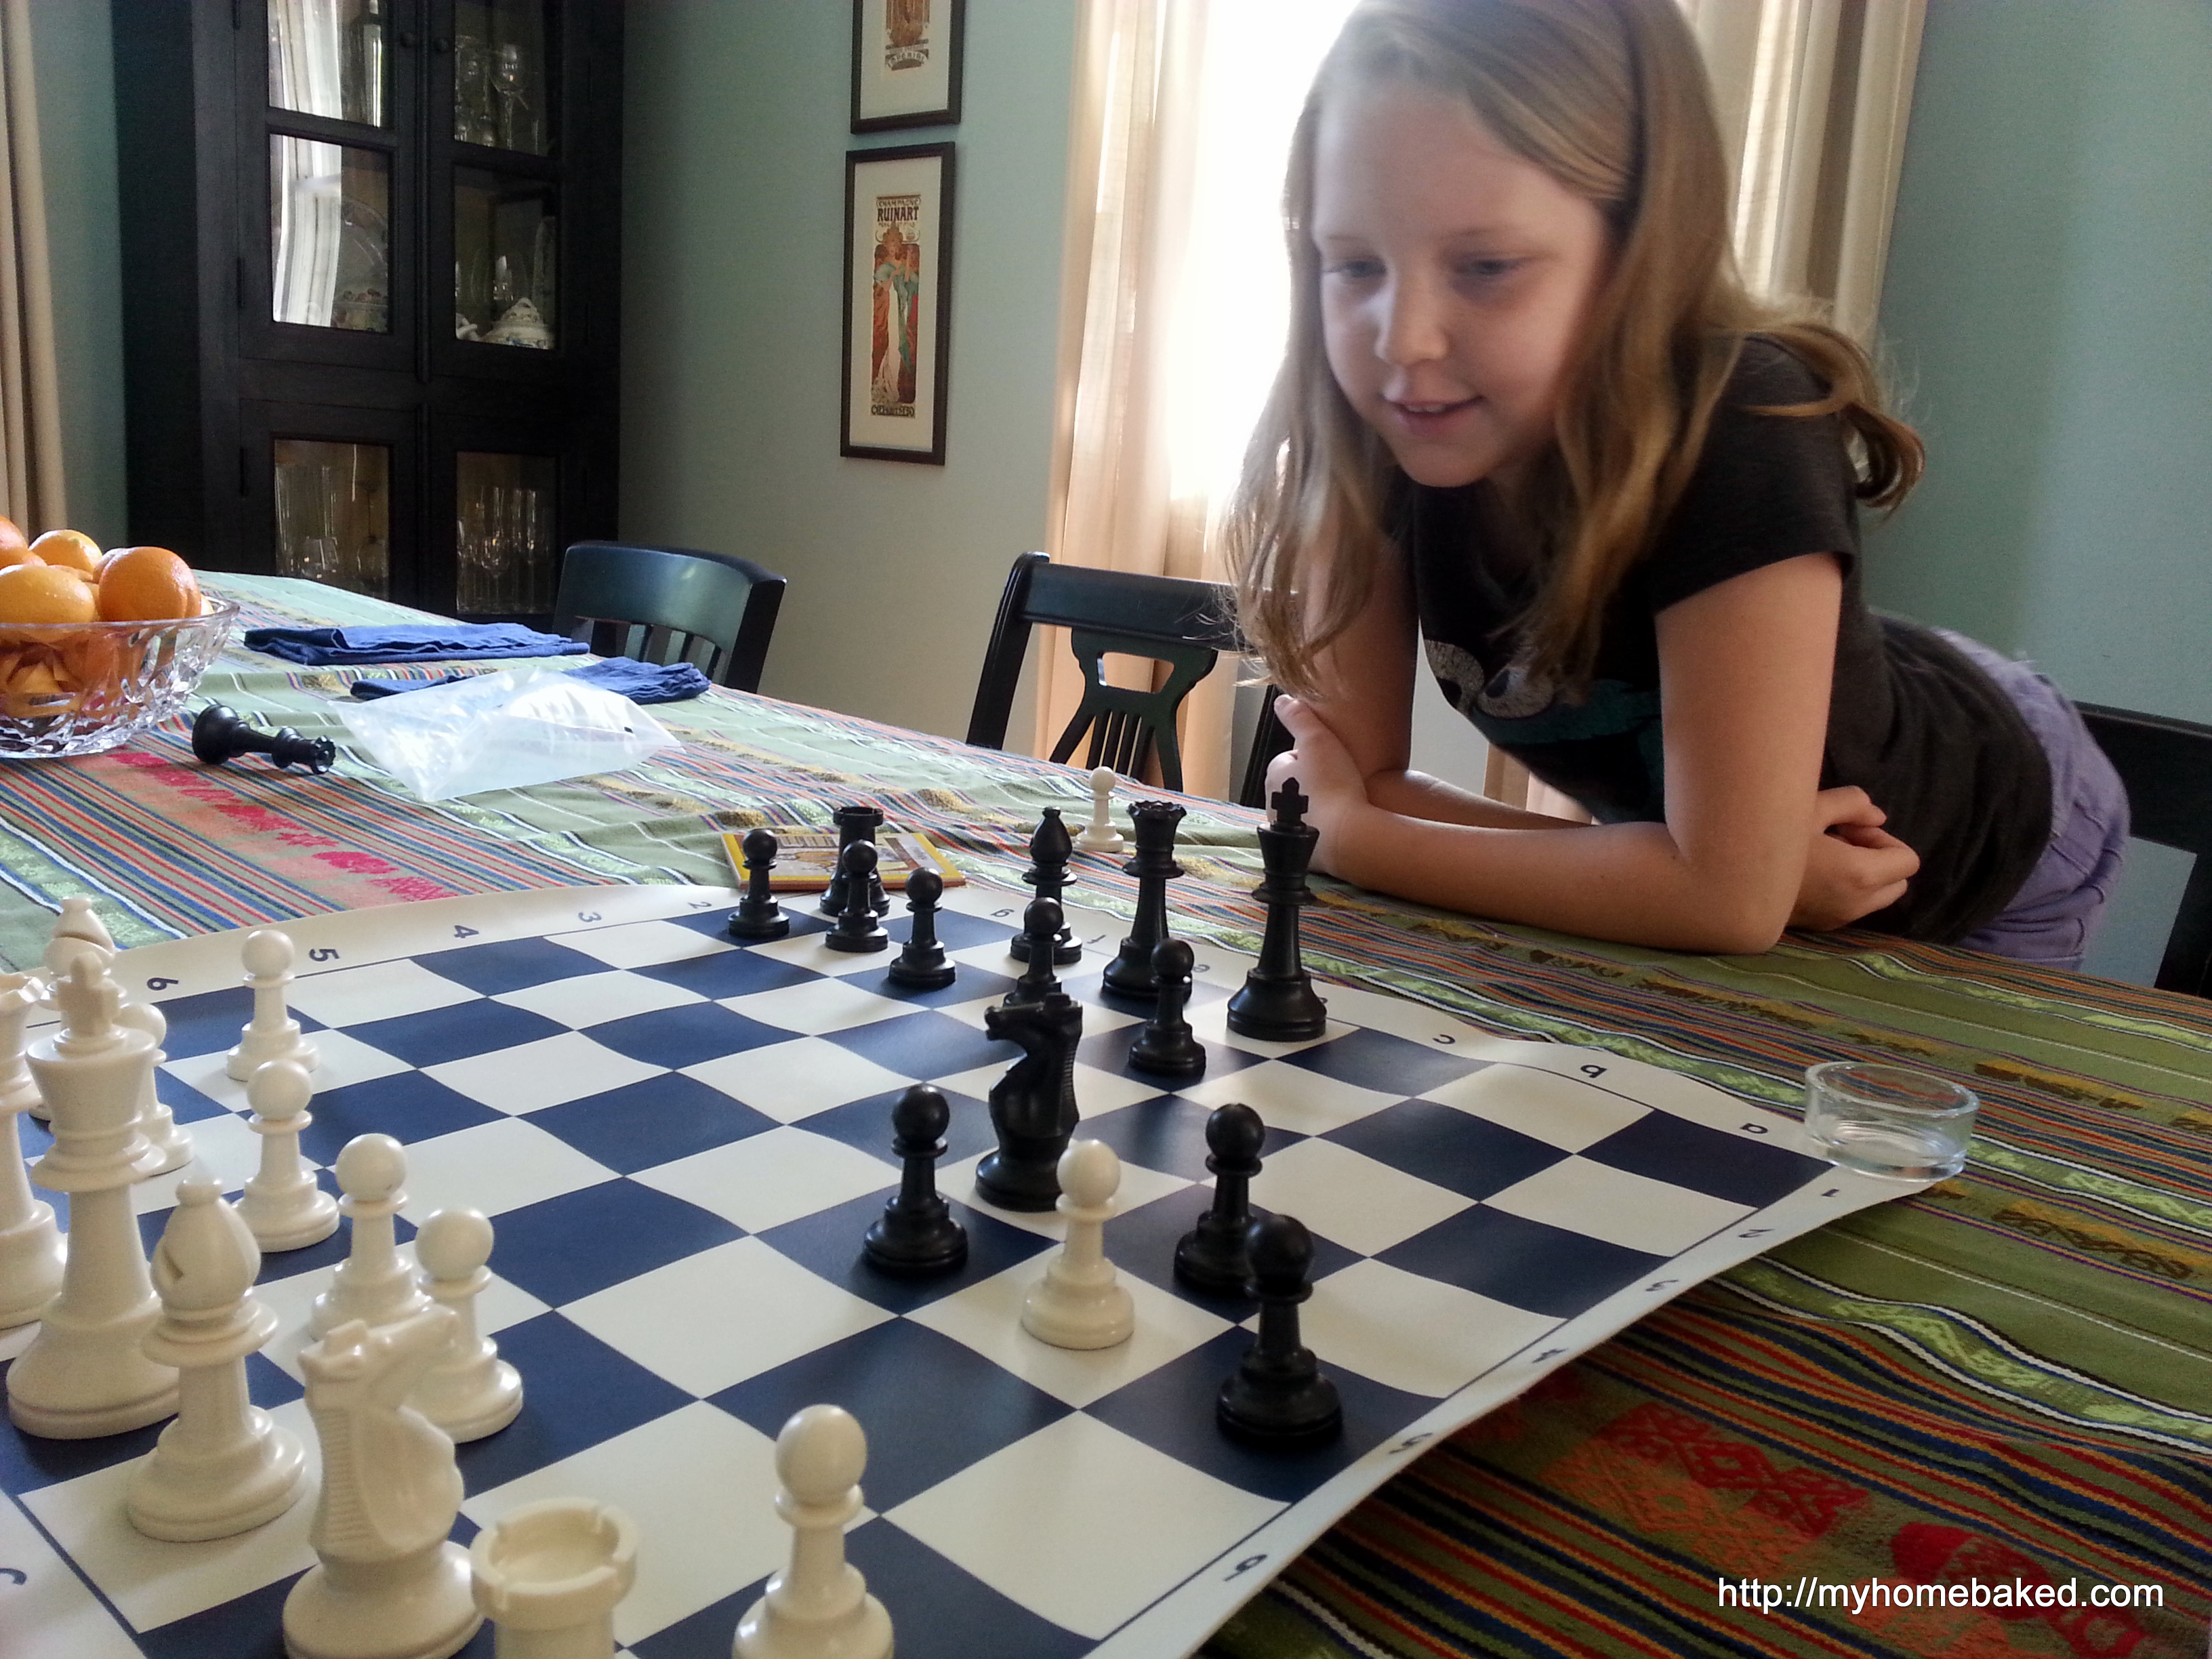
Also, the required one hour of “something else” has spurred them to practice soldering, bake cupcakes, make a menagerie of origami animals, ride bikes and of course, more Rainbow Loom. Miss Eight made layered frozen fruit pops one day, and today Mr. Eleven attempted to teach his siblings how to play chess.

20140625_110951

20140625_111021

I’ve got some projects of my own to tackle, the most immediate being The Office Corner of Doom in the kitchen. I need to remove everything and just start over. Some of our vast collection of food magazines will be relocated, and some kind of simple filing system needs to happen. I also have another stack of artwork to be framed and hung in the family room. Unfortunately, my energy level is not quite back to normal after surgery, and I don’t yet have full strength in my right arm. There is definite progress, but apparently this healing process can’t be rushed. I’m trying to accept that this will not be the summer of big projects. It’s enough to get through the day with clean laundry and food on the table.

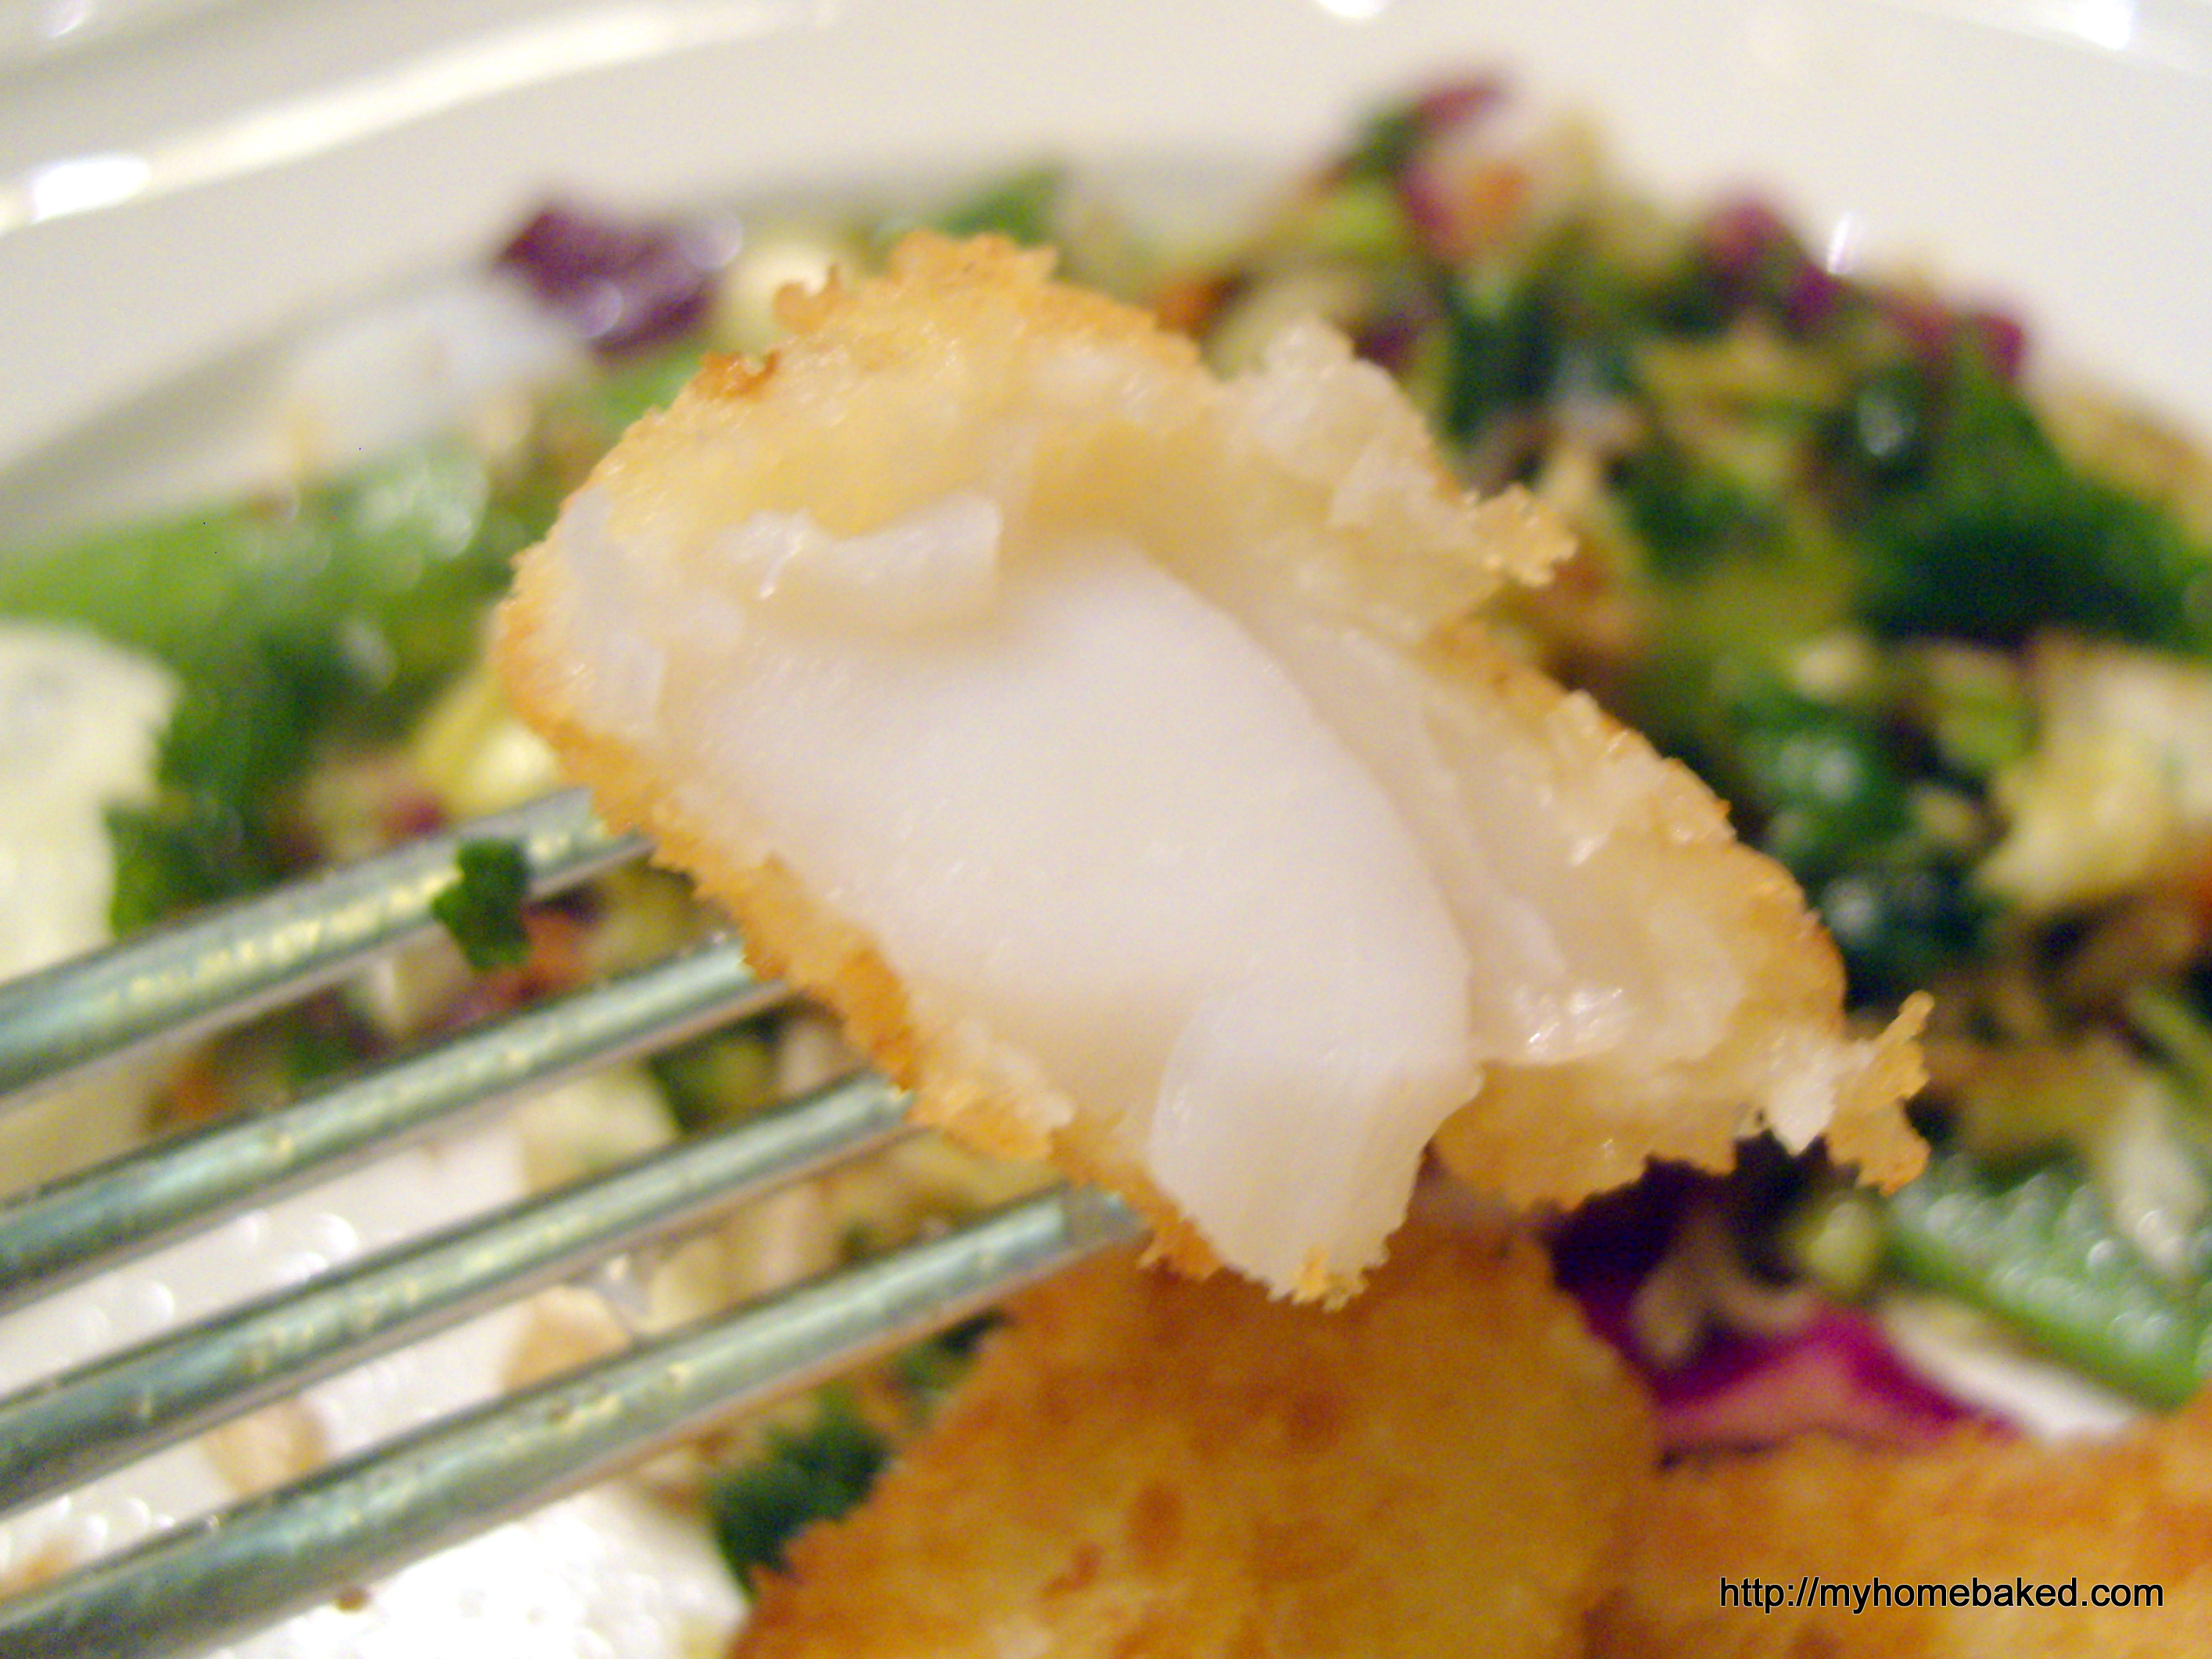
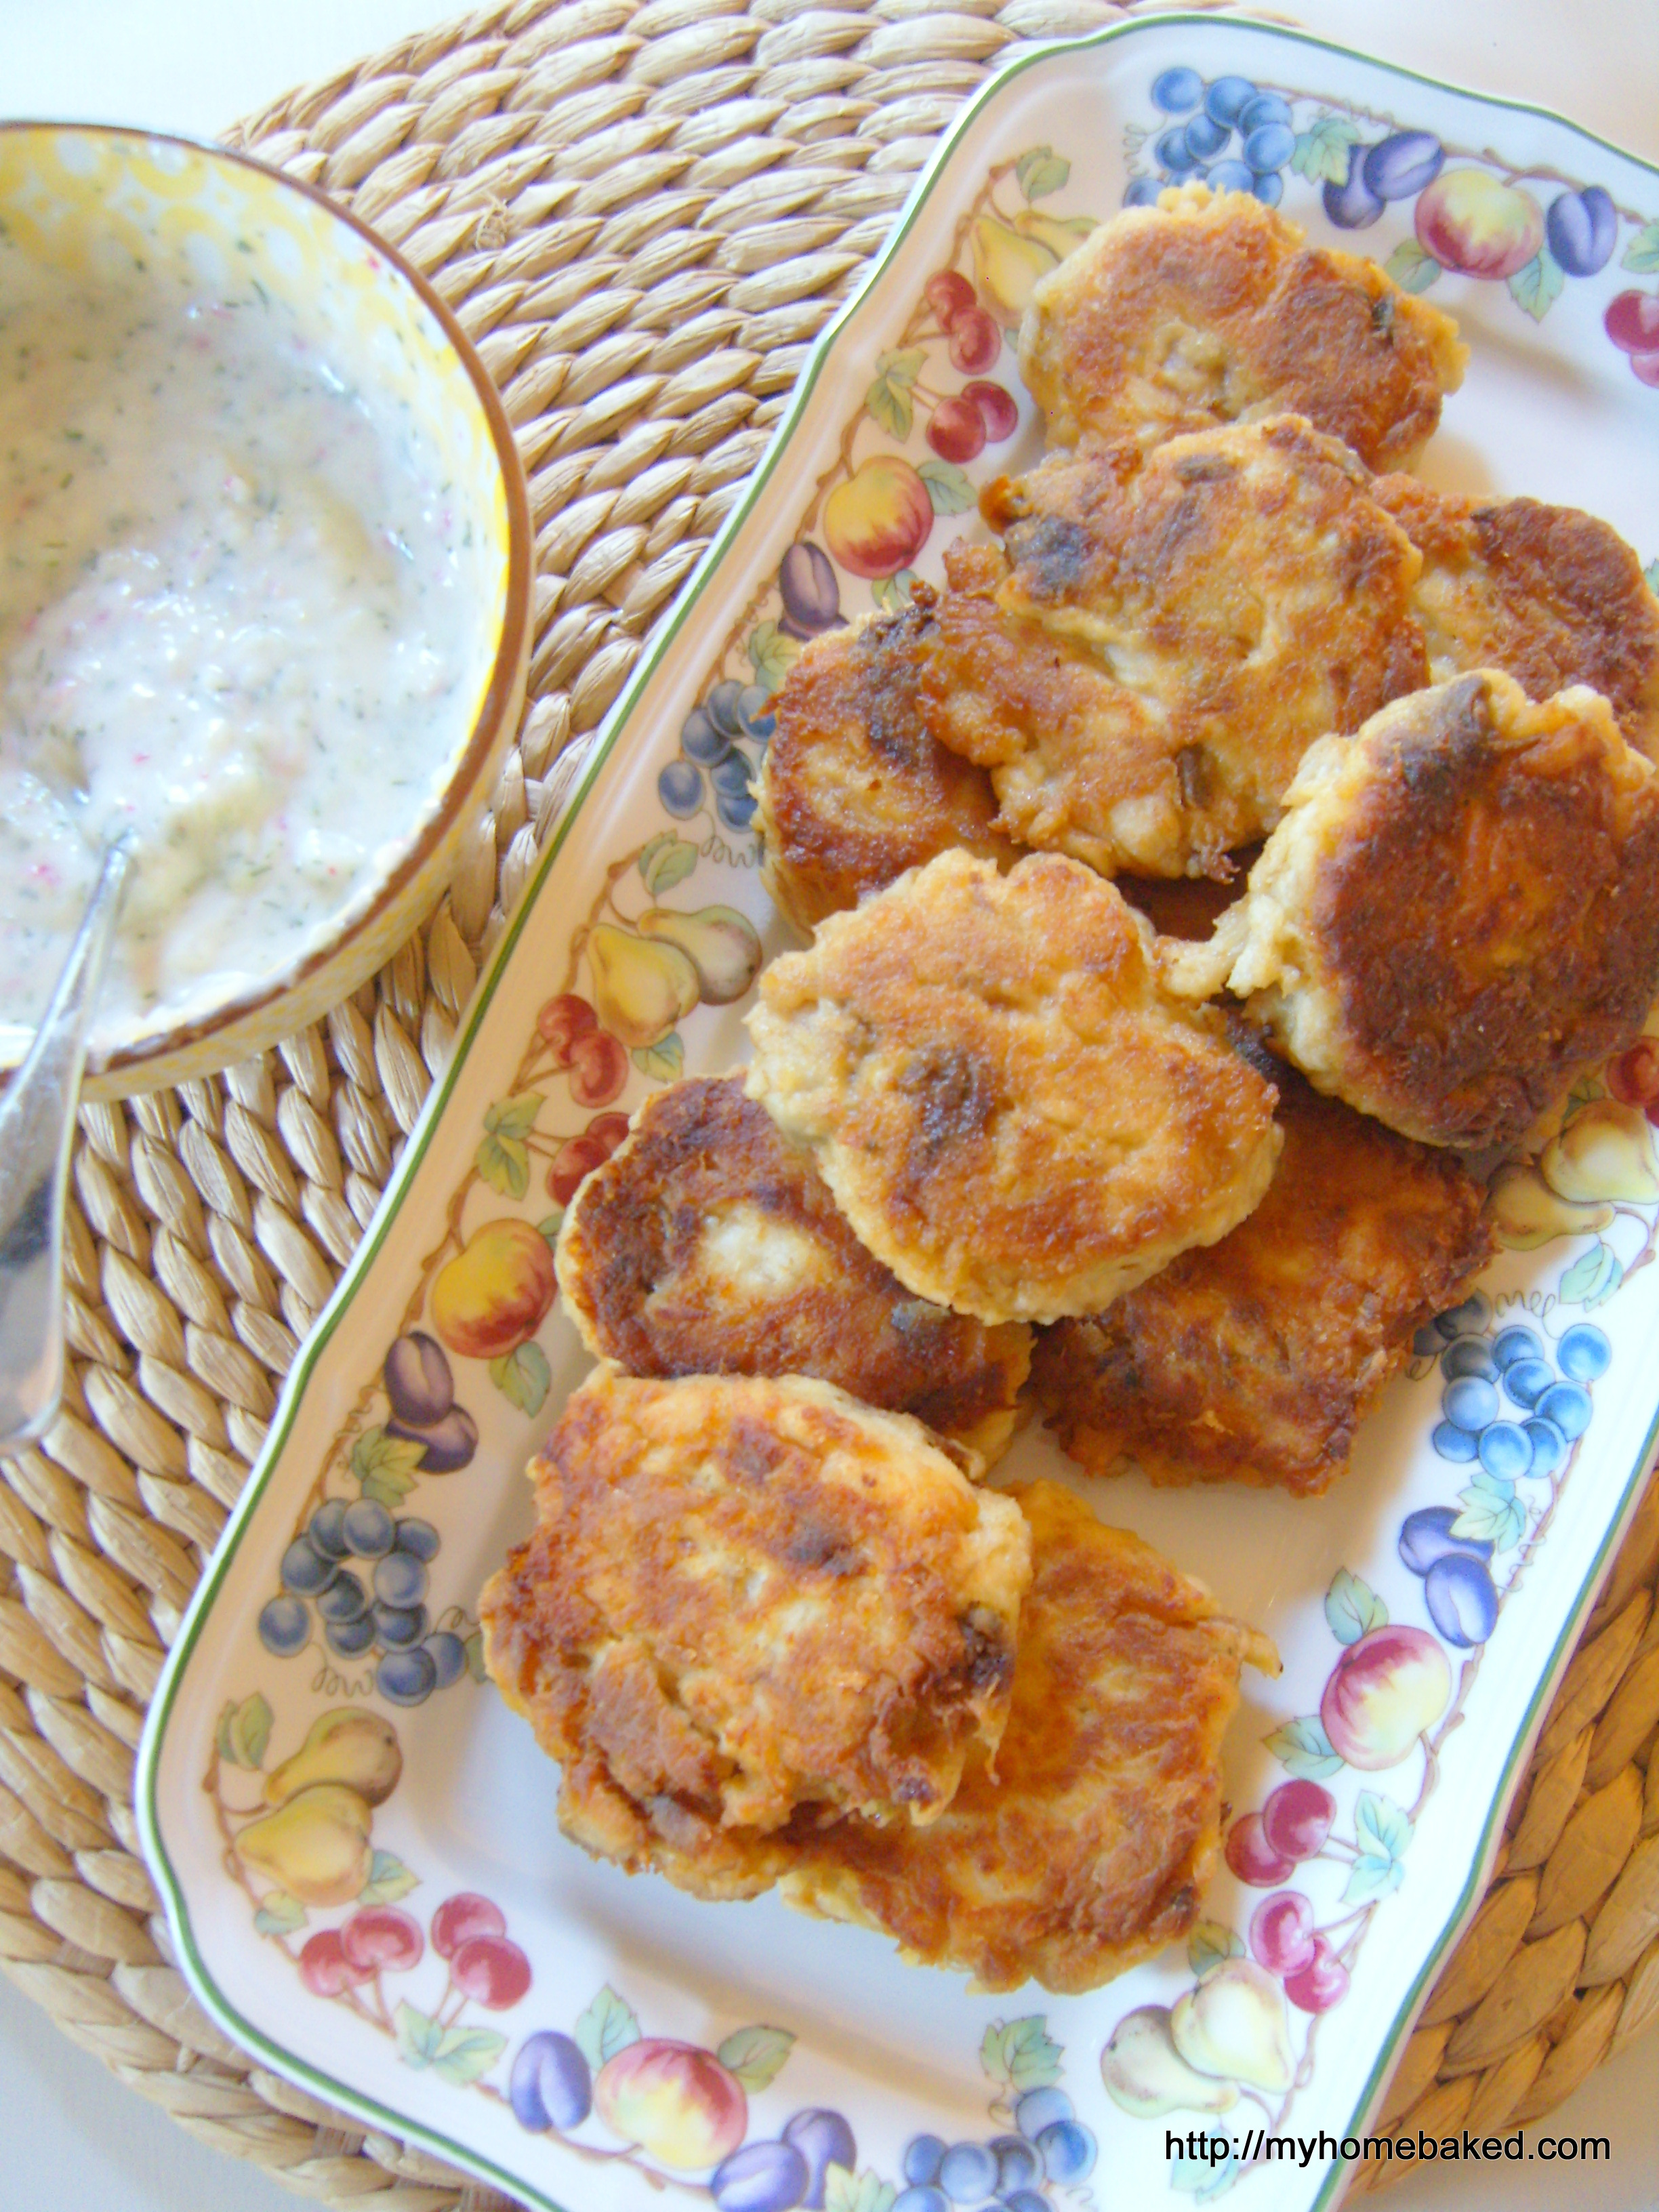
Speaking of food, last week I grilled turkey burgers for dinner one evening. Mr. Eleven declared them “the best burgers ever,” and told me to make them this way always. Since I didn’t follow any particular recipe, I’m writing it down so I can recreate them. They were moist and juicy, and because I didn’t get distracted and leave the grill unattended, they weren’t overcooked. I can’t promise that you’ll get such lavish compliments if you make these, but at least you’ll have dinner on the table.

Best Turkey Burgers Ever

2 lbs. ground turkey

2 eggs, beaten

3/4 cup bread crumbs

1/2 cup milk

1 Tbsp. Worcestershire sauce

1 tsp. onion powder

salt and pepper

In a large bowl, beat the eggs with a fork. Stir in bread crumbs, milk, Worcestershire, onion powder and salt and pepper. Add ground turkey and mix thoroughly. Form into patties slightly larger than the buns, and press down in the middle of the patty so it’s thinner than the sides (see why here). Oil the grates of the grill and cook on med-high heat. Serve on toasted buns with all the trimmings.


Advertisement

A little tarty


Pretty fancy, no? From concept to table, this dessert was made by Little Six. I still have no idea what inspired him, but for a couple of weeks he couldn’t stop talking about a mysterious dessert called a “tarty.” He proposed a few variations (some of which involved several layers of chocolate cake topped with pudding, frosting, fruit and sprinkles), but he seemed very happy with the streamlined version we settled on. We, the taste testers, were happy, too. As promised, here is the recipe.

Tarties

Makes 5-6 individual tarts

For the crust: Put 20 chocolate sandwich cookies (Oreos) and 1/4 cup melted butter in the food processor. Process on high until finely ground. Divide the crumbs evenly among the tart pans and press evenly around the base and sides. Refrigerate for at least 30 minutes.

For the filling: Follow this recipe for Pastry Cream (don’t leave out the whipped cream at the end). When thoroughly chilled, fill each tart crust with pastry cream and smooth with a small spatula.

Just before serving, top each tart with fresh berries, sliced bananas, and toasted almonds.

Homemade Fish Sticks

I wasn’t sure homemade fish sticks were going to be worth the trouble, or the $8.99 a pound for fresh fish, but happily, my reservations were unfounded. They were absolutely worth the minimal effort. You know how frozen fish sticks out of a box become shriveled, dry and…stick-like if you leave them in the oven a little too long? Now imagine the exact opposite: tender morsels of snow-white cod, a light and crispy panko crust–succulent flaky fish goodness.

Here’s some more good news: if you invest the time (and let’s face it, money) in preparing a bigger batch, you can freeze half of it now to whip out and fry another day. (Also, an 8-year-old may volunteer to mop the greasy kitchen floor if you pay her in quarters so she can buy lollipops at school to support shelter dogs. Just so you know.)

Homemade Fish Sticks

adapted slightly from Bon Appétit

2 pounds fresh, wild-caught cod fillets

1/2 cup flour

2 eggs

2 Tbsp. water

2-3 cups panko bread crumbs

a neutral oil for frying

Set up your breading station: Put flour, eggs whisked with water, and panko each in its own shallow pan or dish. Slice cod fillets horizontally into strips about 1-inch wide. Toss the cod into the flour pan and coat each strip thoroughly. Dip them into the egg mixture, again making sure to coat all sides. Finally, toss them into the panko, pressing extra crumbs into the sides if necessary. (If you are freezing a portion, lay the breaded fish sticks out on a baking sheet, cover with foil, and freeze for a couple hours, or until they are solid. Then transfer the frozen fish sticks to an airtight freezer bag or container.)

Heat 1/4 inch of oil on medium-high in a non-stick skillet. Fry the fish sticks in small batches until golden (about 3 minutes per side). Drain them on a paper-towel lined platter or a wire rack set over a baking sheet. If necessary, keep the fish sticks warm in a 300-degree oven until ready to serve.

Quick Tartar Sauce

Stir together in a small bowl: 1/2 cup sour cream, 1/4 cup mayonnaise, 2-3 Tbsp. sweet pickle relish, and 1 tsp. Dijon mustard.

Multigrain Apple Butter Muffins

Muffins make me feel good. Let me count the ways:

  1. They scent the house with cinnamon-y goodness.
  2. 100% whole grain. Bonus points for the bran. (Some children around here need more fiber.)
  3. Portable. (You can pack your snack when you move Operation Homework to the park district for an hour while Little Brother is at his karate class.)
  4. Thirty minutes, start to finish.
  5. The apple butter is on the INSIDE!
  6. Freezable.
  7. The recipe is flexible: use whatever combination of flour you have (or 2 cups of Multigrain Flour Mix). And if you’re running out of milk, making up the difference with juice or water is perfectly acceptable. It’s like Stone Soup, but in muffin form.

Multigrain Apple Butter Filled Muffins

1 cup whole wheat flour

1/2 cup barley flour

1/4 cup millet flour

1/4 wheat bran

1/2 cup brown sugar

1/2 tsp. salt

1 Tbsp. baking powder

1 tsp. cinnamon

1 cup milk

1/4 cup oil

2 eggs

small jar of apple butter

Heat oven to 500 degrees F. Grease 12 muffin cups.

In a large bowl, whisk together flours, wheat bran, brown sugar, salt, baking powder and cinnamon. In a 2-cup measuring cup or small bowl, whisk together milk, oil and eggs. Whisk the liquid ingredients into the dry, blending for no more than 20 seconds.

Fill each muffin cup half full of batter. Add a heaping teaspoon of apple butter to each cup, and then just enough batter to cover the apple butter, distributing any extra batter evenly among the cups.

Turn the oven temperature down to 375 degrees and bake for 20 minutes. Cool muffins on a rack. Best served slightly warm.

Fish cakes

Aside from that one bad experience with a Dover sole (it was probably just a virus), if given a choice, I will still choose the seafood. My boys like fish, too, and Miss Eight eats it sometimes, which is better than nothing. They also like most anything made into a little fritter, even if they won’t eat it otherwise (i.e., zucchini).

I love the transformative power of the fritter to turn scraps (or good food that some people think they don’t like) into a perfectly lovely meal.

I was digging through the freezer, attempting to use up some bits of this and that, and decided to try making some fish cakes with two small tilapia fillets and about half a pound of smoked mackerel (left over from brunch a few months ago). I quickly pan-fried the tilapia, and then flaked it into the mixing bowl with the mackerel. I wasn’t sure how the smoked fish would fly with my taste testers, but I got one “Really good!”, one “Cleaned my plate!”, one “Tastes better than it smells,” and one “How many bites do I have to eat?” I thought these little fish cakes were delicious. I like smoked fish on a bagel, so it really isn’t such a surprise. Granted, the frying fish smell was a little strong, but nothing that some open windows and a pine-scented candle couldn’t erase.

You can use whatever fish you have, really–canned, grilled, smoked. Because I had a high proportion of smoked fish, I didn’t add much seasoning, but if you have a mild fish you will want to add salt, pepper, a dash of Worcestershire or soy sauce, and maybe some scallions or chives. In place of bread or cracker crumbs, you could use some mashed potato. Experiment!

Fish Cakes

     makes about ten 2 1/2–inch cakes

1 pound of cooked fish, skin and bones removed.

1 egg, beaten

3/4 cup bread crumbs

1/2 cup mayonnaise

1/4 tsp. cayenne pepper

flour for dredging

neutral oil for frying

Stir together the egg and mayonnaise, and then fold in the remaining ingredients, breaking the fish into small chunks or flakes. Chill the mixture for at least 15 minutes.

Pour just enough oil into a large nonstick skillet to coat the bottom (about 3 Tbsp.) and turn the heat to medium-high. Scoop the fish mixture (about golf-ball size), press into small patties and dredge in flour. Fry until golden brown, about 3 minutes per side. Drain on a paper towel lined plate.

Serve with remoulade sauce, tartar sauce, or any kind of sour cream or yogurty-dill sauce. To continue my thrifty theme, I puréed a little bit of this leftover salad and whisked in some mayonnaise.

The Evolution of the Waldorf Salad

Remember Waldorf Salad? Apples, nuts, grapes, celery, mayonnaise? So retro! (Apparently the Waldorf Astoria still serves it, fancied up with black truffles.)

I grew up eating this salad on a regular basis, but over the years, it evolved into something else. First, you have to understand that we ate this as dessert, not as a salad. We skipped the celery. For a long time, a few maraschino cherries (and a splash of juice from the jar) dressed it up. Eventually, sour cream or yogurt replaced the mayonnaise. Raisins got traded for diced prunes (too mushy, in my opinion) or dried cranberries. The maraschino cherries became passé, replaced by a little lime zest.

I haven’t managed to convince my children that apple salad = dessert (perhaps I should bring back the cherry on top), but it still makes an appearance on our table, especially in the fall. I’ve been known to eat the leftovers for breakfast. Whatever you call it, it’s good.

Apple Salad

4 medium apples, cored and diced (no need to peel)

1 cup of grapes, halved

1/2 cup raisins or dried cranberries, or both

1/2 cup walnuts or pecans, chopped (toasted is extra nice)

1 cup plain yogurt

1 Tbsp. honey

a couple squeezes of lemon juice

Toss all the ingredients together in a bowl. Serve.

Roasted Eggplant and Red Pepper Marinara

Two weeks of summer vacation are already gone, and quickly, too. We’ve kept busy–in a good way–but I’m finding it difficult to blog, even if I have something to blog about. Someone is always hanging over my shoulder, or needing my attention RIGHT NOW, MOM, or just generally being noisy. Last night while supervising the brushing of teeth, I asked, “Why do you have to be so loud all the time?” Little Five answered, “We can’t help it. We’re kids.”

This morning’s noise involves repeatedly knocking wooden astronauts to the floor, accompanied by some maraca-like shaking of a plastic piggy bank. Also, yelling. Oh, and slamming doors. But I promised you a recipe, so I’m going to deliver.

I really love eggplant. Unfortunately, some of the best eggplant recipes take time, and then the kids won’t eat it anyway. Eggplant Parmesan, Moussaka….But in my experience, most of the time kids are more picky about texture than about taste. Maybe this is true of adults, too. (Exhibit #1: Miss Seven doesn’t like tomatoes, but will eat tomato soup. Exhibit #2: Pot roast? “Too chewy. Do you have any meatballs?” Exhibit #3: Liver and onions? “Ew.” Chicken liver pâté on a cracker? “Yes, please.”)

In short, if I puree it, they will eat it.

I adapted this recipe from an old Rachael Ray cookbook. I always found the cooking time way off, and the sauce was under seasoned, but the basic idea was great. Roast an eggplant, puree it, and swirl it into some garlicky tomato sauce. I roasted a red pepper, too. The combination gives a basic marinara a meatier, smokier flavor, and the eggplant even balances some of the acidity from the tomatoes and makes it a little creamy. I didn’t plan it, but all three–tomato, eggplant and pepper–belong to the nightshade family.

Roasted Eggplant and Red Pepper Marinara

Heat the oven to 400 degrees. Line a baking pan with foil (for easy clean up). Prick a large eggplant several times with a fork or sharp knife, and roast the eggplant and one red pepper until the eggplant is soft, the red pepper has browned all over (you may want to turn the pepper a few times during roasting for even browning), and both have begun to slump (45 minutes-1 hour). Let them cool on the baking pan until you can handle them.

With your fingers, peel the skin from the pepper and remove the stem and seeds. Cut off the stem end of the eggplant, slit it down the side with the knife, and scrape the flesh from the skin into the bowl of the food processor. Add the peeled red pepper and puree until smooth.

Heat a drizzle of olive oil in a deep saucepan and cook 3-5 cloves of minced garlic, just until golden, about a minute. Stir in one 28-ounce can of crushed tomatoes (mine were diced, so I pureed them with the immersion blender) and bring to a simmer. Stir in the eggplant and pepper puree, and salt and pepper to taste. Heat through. Serve over the pasta of your choice with a good sprinkling of grated Parmesan.


Crab Cakes

I love crab cakes. There’s a good reason you find them on so many restaurant menus. They can be a bite-size appetizer (the Hub used to make them for parties, back when we used to have parties), or you can make larger patties to serve as a main course (alongside a big salad and some crusty bread, so you don’t make a glutton out of yourself over the crab cakes alone).

I have followed this recipe to the letter, with good quality crab meat and beautiful shrimp that required peeling and deveining. They were so good I wanted to hide them from the guests and huddle in a corner with my bowl of remoulade. But for a weeknight, when you’re trying not to blow the grocery budget on a single meal, you can absolutely make these with whatever proportion of canned crab and frozen shrimp you have. It’s a reassuringly flexible recipe, and last week I used one little can of crab and about a pound of cooked frozen shrimp, scaling down the other ingredients slightly (I also halved the remoulade). The entire platter was devoured, and Miss Seven asked me the next day if there were any crab cakes left for lunch. Now that’s high praise.

Crab Cakes

1 lb. crab meat

1 lb. shrimp, chopped

1/2 cup fine bread crumbs

1 tsp. cayenne

1/2 tsp. hot sauce (like Tabasco)

1/4 cup scallions, chopped

1 tsp. Worcestershire (or soy sauce)

5 eggs

1/2 cup mayonnaise

1/4 cup water

2 cups flour

2 cups bread crumbs

Oil for frying

Combine the seafood, bread crumbs, cayenne, hot sauce, scallions and Worcestershire. Add one egg and the mayonnaise. Mix thoroughly and shape into patties (I used an ice cream scoop). Whisk the remaining 4 eggs with the water in a shallow dish. Lightly dredge the patties in flour (they’ll want to fall apart, so be patient and just keep sticking them back together), dip them into the egg mixture, and then the bread crumbs.

Heat 2-3 Tbsp. of oil over medium-high heat in a large sauté pan (I use my nonstick pan). Fry 4-6 crab cakes at a time–don’t crowd them)–until lightly brown on both sides. Add oil between batches if necessary. Keep them warm on a paper towel-lined platter in a 200-degree oven.

Serve with Remoulade Sauce:

2 cups mayonnaise

1/4 cup cornichons, chopped

1/4 cup capers, chopped

1 oz. chives, chopped

1 tsp. paprika

1/2 tsp. cayenne

1 oz. anchovies, chopped

salt and pepper to taste

Mix all ingredients together and chill. (Leftover remoulade + can of tuna = fabulous lunch.)

Mediterranean Barley Salad

A few weeks ago, I shared my attempt to better plan my lunches. For me, the most successful strategy so far is possibly the simplest: COOK MORE. Intentional leftovers, I mean. (If you’re one of those people who doesn’t eat leftovers…well, I don’t have much to say to you. I’m probably thinking, “What!? Are you crazy?” But if you don’t have anything nice to say…) Sure, there are some things that don’t keep very well (leafy greens in dressing, for one), but most things do just fine reheated the next day. I don’t mind the repetition, but you can always alternate days or package up your leftovers in lunch-sized containers for the freezer. But if I double a dinner recipe, instead of just hoping there will be a serving or two left for the next day, I haven’t gone to any extra trouble and I miraculously have several lunches already prepared for the rest of the week. Grains, pastas, soups and slow-cooked meats are especially suited to this treatment.

This barley salad is a filling, all-in-one side dish (we had it with steak), but it also becomes a nice centerpiece to a lunch (I rounded my plate out with the last bit of egg salad), and if you want more protein you can add some grilled chicken or a bit of thinly sliced steak, or maybe a few slices of cured meat. The recipe is scaled up to serve for several meals, and you can vary it by adding other roasted vegetables, scallions, red onions, or lemon juice instead of vinegar. Use what you have, and taste as you go. If you toss the feta with the barley while it’s still warm, it melts and binds the whole dish together, which I love. If you prefer chunks of feta, wait until the salad has cooled to room temperature before tossing in the cheese.

Mediterranean Barley Salad

2 cups pearl barley

5 roasted sweet peppers, diced

1 large onion, sliced thinly

4 ounces feta, crumbled

large handful of cilantro, chopped

2 Tbsp. tahini

3 Tbsp. red wine vinegar

4 Tbsp. extra virgin olive oil

salt and pepper

Bring a large pot of salted water to the boil. Add the barley and simmer until tender, up to 1 hour, adding more water to the pot if necessary (I keep a tea kettle of boiling water handy). In a small skillet, slowly sauté the sliced onions in a Tbsp. of olive oil, stirring regularly, until they are caramelized. Meanwhile, in a large bowl, whisk together the tahini, vinegar, salt and pepper until smooth. Continue to whisk while drizzling in the olive oil. Set aside.

Drain the barley, and add it to the dressing in the bowl. Add the roasted peppers, caramelized onions and feta, and mix well. Add salt and pepper to taste.

Bananas Foster Upside-Down Cake

Just a little public service announcement…

If you haven’t been reading the Bakers Select blog regularly (add it to your blog reader or click on the link in the sidebar–>), I just wanted to point you in that direction. Today’s post includes the recipe for this Bananas Foster Upside-Down Cake that I adapted from a whole slew of banana cake recipes. I’m excited to make it again soon, because the one sitting on my kitchen counter isn’t going to last long.

You can click right here or on the photo above to get the recipe. Try it!