Monday Menu

It’s been a long weekend packed with family and beautiful fall weather. We spent a few hours with pumpkins and pony rides, cider and doughnuts at Johansen Farms. We enjoyed an early Thanksgiving dinner (never mind the calendar–we celebrate whenever we can gather the family), and now we’re having a slow morning of music practice, homework and a second cup of coffee. Grandparents are visiting, and the kids are on slightly better behavior than usual. It’s a good way to spend a holiday!

The coming week is packed with activities and deadlines, so I’m not feeling too ambitious with the menu. Just favorite comfort foods, and using up what’s in the fridge. I also have bounty of tomatoes and peppers to preserve thanks again to Aunt Karen. I’m excited to get out the canner and stock the pantry with tomato sauce and roasted peppers.

Monday: Leftovers, baby!

Tuesday: Pasta pesto (unless someone has a creative but quick suggestion for a bag full of fresh basil?); roasted beet and goat cheese salad

Wednesday: Meatball subs

Thursday: Slow cooker stuffed peppers, mac and cheese

Friday: Sandwich night (perhaps with the waffle iron)

Saturday: Thai red curry with pork and acorn squash


Last week on Home Baked

Cuban Sandwiches

The garden project: phase one

Monday Menu


Do you preserve any garden produce for the winter?

Cuban sandwiches

Ah, Sandwich Night. Universally beloved in our house, the night when utensils are optional, and there might be a bowl of chips on the table (a rare enough event). Dinner is quick, but hot, delicious (there’s usually melted cheese involved), and received with appreciation.

If I have a pork roast on the menu, my favorite way to use the leftover meat is in Cuban sandwiches. You’ll also need bread (something with a little crust but not as crispy as a baguette–Mexican bolillos, hoagie rolls, or an Italian loaf sliced into generous chunks), sliced ham, mild Swiss cheese, and sliced dill pickles. Some of us like a little mustard, too. Heat a griddle or frying pan and melt a little butter on it. Add the sandwiches and press them down firmly with a heavy cast iron skillet (or a brick wrapped in foil). If you have a panini press, I imagine that would work well, too. After 3-5 minutes, flip the sandwiches and grill until the cheese is melted and the breaded is toasted. Press them again if necessary.

Go forth and have your own Sandwich Night!

The garden project: phase one

It’s been a long time since I first mentioned our landscaping project. We’ve moved at a glacial pace…lots of thinking, waiting, budgeting, thinking, waiting… Then we spent the majority of the summer traveling, so all projects were put on hold. But I’m excited to report that Phase I is finally a reality!

To refresh your memory: Our backyard has some serious drainage problems. Rain water and runoff flows from our neighbors’ lots on three sides into our low-lying property. Our ejector pumps also used to discharge under the patio and straight under the back lawn, causing erosion and subsidence of the soil over time. Every time we had a rainstorm, we had a swampy yard and standing water in some places, often taking weeks to drain. Grass wouldn’t grow, the lawn was bumpy, and the kids couldn’t go out and play without returning soaking wet and splashed with mud.

We have been so happy working with Dig Right In these past few months. They listened to our concerns and our vision for out outdoor space. They designed a complete plan for us (both a drainage plan and a landscape design), and then broke it down into phases so that we could prioritize and make some progress within our budget. What I most appreciate is their willingness to view the project as long term and to work within the reality of the budget we have at the moment. They are also committed to creating sustainable, Earth-friendly landscapes and educating homeowners about chemical-free lawn care and conservation practices.

So where are we now? We decided for this phase we would focus on improving the drainage. Jeff mapped out a swale to direct the water coming into the back of our property and move it (along with water from our downspouts and ejector pumps) toward the storm water sewer on the street in front of our property.

The crew began by removing some of the larger “weed trees” and out of control shrubs around the perimeter of the lot. Then they started moving the soil to create a channel for the water and keep it out of the center of the lawn. They added new sod to the swale to eliminate erosion, and in a future phase, we’ll also have a dry streambed of stones and rocks.

What else do we have to look forward to in future phases? To complete the drainage plan, Dig Right In will create a domed lawn for us so rainwater runs down into the swale and doesn’t pool in the grass. They’ll help us create some new perennial beds around the patio, reusing many of the plants that we already have. They also gave us a beautiful design for the front yard. The progress they made in a single day has really motivated us to get out  and do some of the work ourselves.

My dear friend Jen came with her shovels and helped me dig out the large overgrown bed along the east side of the back yard that is destined to become a vegetable garden. (Let’s be real: I helped her.) We trimmed branches, dug up yucca plants with their gigantic roots, eradicated more purple loosestrife, and pulled out countless day lilies to give away. I weeded several more beds (some more thoroughly than others), and we borrowed a chainsaw so that we can continue to cut down the overgrown shrubs and hedges. It’s a work in progress!

Monday Menu

This week’s inadvertent menu theme is Around the World. I love it when that happens. I also love it when I know there are a couple nights I won’t have to cook. In my imagination, time will magically expand so that I can finish three different painting projects, clean the house, write six blog posts and a proposal, bake cookies, chain saw the rest of the hedges, and redecorate two bedrooms. Among other things. I get a little ambitious in the week before my inlaws come to visit.

Monday: Cabbage Rolls (from the freezer)

Tuesday: Fish tacos

Wednesday: Lasagna (Mom’s bringing dinner!)

Thursday: Sesame Soba Salad with Shiitakes and Tofu Croutons (Cook This Now)

Friday: Braised pork country ribs, mashed potatoes

Saturday: Aguado de Gallina (Ecuadorean Chicken and Rice Soup), London Broil, potatoes, salad

Sunday: Early Thanksgiving family gathering (I’m responsible for pie and cranberry sauce)


Last week on Home Baked

Banana Walnut Cake

Monday Menu


What would you do today if you didn’t have to make dinner?

Banana walnut cake

I cannot pass the shelf of produce past its prime at the grocery and not bring home those three pounds of bananas for $.69. I just can’t. (It’s a good place to buy eggplant and peppers, too–stuff I’m just going to roast until it’s deliciously shriveled, anyway.) Sometimes the pack goes straight into the freezer, ready for smoothies and one-ingredient banana ice cream and banana bread. Sometimes, if they’re not so terribly spotted yet, they stay on the counter for a few days for peanut butter and banana sandwiches and the occasional meeting with a bowl of Cheerios.

I adapted this cake slightly from this Smitten Kitchen recipe for Caramel Walnut Upside Down Banana Cake. I know, I know. What about the caramel? Well, I believed Deb when she wrote that the caramel is excessively sweet and it hardens too much. So I skipped it. What I think this cake really needs is a generous drizzle of salted caramel sauce. I didn’t get around to it. But you might.

I baked the cake in a 10″ springform tube pan. You can also use a 9″ round pan, or even try some loaf pans or an 8″ square. The tube pan made a plain cake pretty, though, and shortened the baking time to a quick 35-40 minutes.

Little Four took one look at the slice of cake on his plate and said, “Mom! It’s banana bread CAKE! That’s so AWESOME!”


Banana walnut cake

adapted from Smitten Kitchen

1 3/4 cups cake flour

1 tsp baking powder

3/4 tsp baking soda

1/2 tsp. salt

1/2 cup unsalted butter, softened

1/2 cup sugar

1/2 cup brown sugar, packed

2 large eggs

1 1/2 cups mashed banana

3 Tbsp. sour cream

1 Tbsp. dark rum (I would add an extra Tbsp. next time)

1/2 tsp. almond extract

3/4 cup toasted walnuts, chopped

Heat oven to 350 degrees. Whisk dry ingredients together in a medium bowl. Beat butter and sugars together in a large bowl until creamy. Beat in eggs, then mashed bananas, sour cream, rum and almond extract. Mix in dry ingredients in two additions until just combined. Stir in walnuts.

Spread batter into a greased and floured baking pan (see notes above about size). Bake for 35-45 minutes, or until a toothpick inserted in the center of the cake comes out clean. Cool completely in the pan on a rack before unmolding. Serve with caramel sauce, whipped cream, ice cream, a dusting of powdered sugar, or nothing at all.

Monday Menu

I like to bake bread myself, but this weekend I bought two big European style loaves from our local market, on sale for $.99 each. They were still warm from the oven, with a crisp crust and a pillowy white center. We ate some over the weekend, and I cut the rest into chunks and froze them so we can eat bread all week. Any bits languishing in the freezer will end up in baked French toast or a strata.

My other discovery this weekend was ground turkey thighs on sale at Whole Foods. I promptly scratched out my original plan for Friday night and substituted turkey burgers. It’s great to have a  menu plan and a list to shop from, but some of the best meals arise from a little serendipity.

Monday: Split pea soup with ham, croutons (didn’t make this last week–we had leftovers instead)

Tuesday: Italian Sloppy Joes, kale chips

Wednesday: Creamy Corn Soup (from the kids’ cookbook, Honest Pretzels, by Mollie Katzen), sandwiches

Thursday: Pork fried rice (I saved some sliced pork tenderloin from the pork medallions I made on Saturday)

Friday: Turkey burgers, oven fries, warm green bean salad with vinaigrette


Last week on Home Baked

Homemade chalk paint: a dining table makeover

Multigrain pumpkin banana bread (or muffins)

Monday Menu


Did you find a great sale or delicious ingredient to plan a meal around this week?

Homemade chalk paint: a dining table makeover

Somehow I always have a list of things to paint. The siren call of a cheap furniture makeover never fails to seduce me. The dining room table has been on this list forever, but until recently I couldn’t decide how to paint it. I bought it more than 15 years ago from a friend of a friend for $100. She had bought it from a consignment store. It’s a large rectangular table, but with unusual angled corners. It also came with three leaves and a complete set of custom table pads. Since we regularly host family and friends for dinner, we love its flexible size, and a new table of comparable dimensions isn’t really in the budget. But the finish on the table has seen better days, and some of the veneer on the apron is cracked, peeling, or just plain gone.

I finally decided this table might look good with a creamy antiqued finish, similar to the Swedish antique style. I’d also read all sorts of raves about Annie Sloan Chalk Paint, and how easy it to use on furniture. No priming! But at $30-something a quart, it felt too expensive. And then I came across a homemade formula for chalk paint. The results looked good, so I decided to give it a try. I already had paint, and only had to buy plaster of Paris, which was less than $7 at Home Depot.

I’m really happy with how the table turned out. It only took two coats of the homemade chalk paint to cover, and then I sanded the edges of the table just a little, so the original wood finish would peek through. After a coat of natural paste wax (two coats on the table top), we brought the table back in the house.

I think the new color lightens up the room, and I definitely appreciate not having to cover the ugly scratched finish with a tablecloth (have you seen what a four-year-old can do to a tablecloth in a single meal?). I’ve crossed this item off the list, but the list isn’t any shorter. The day after I finished it, I found a wicker chair on the curb, just waiting for a little love and spray paint.

Multigrain pumpkin banana bread (or muffins)

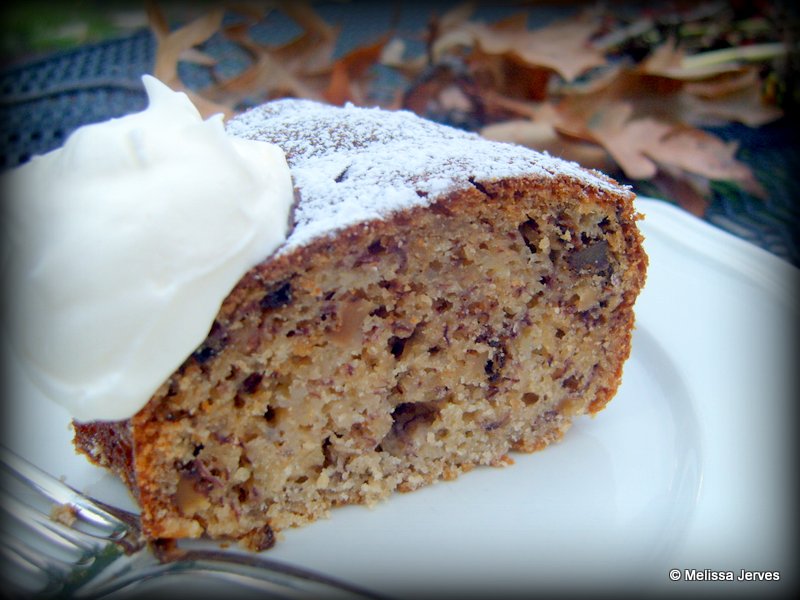
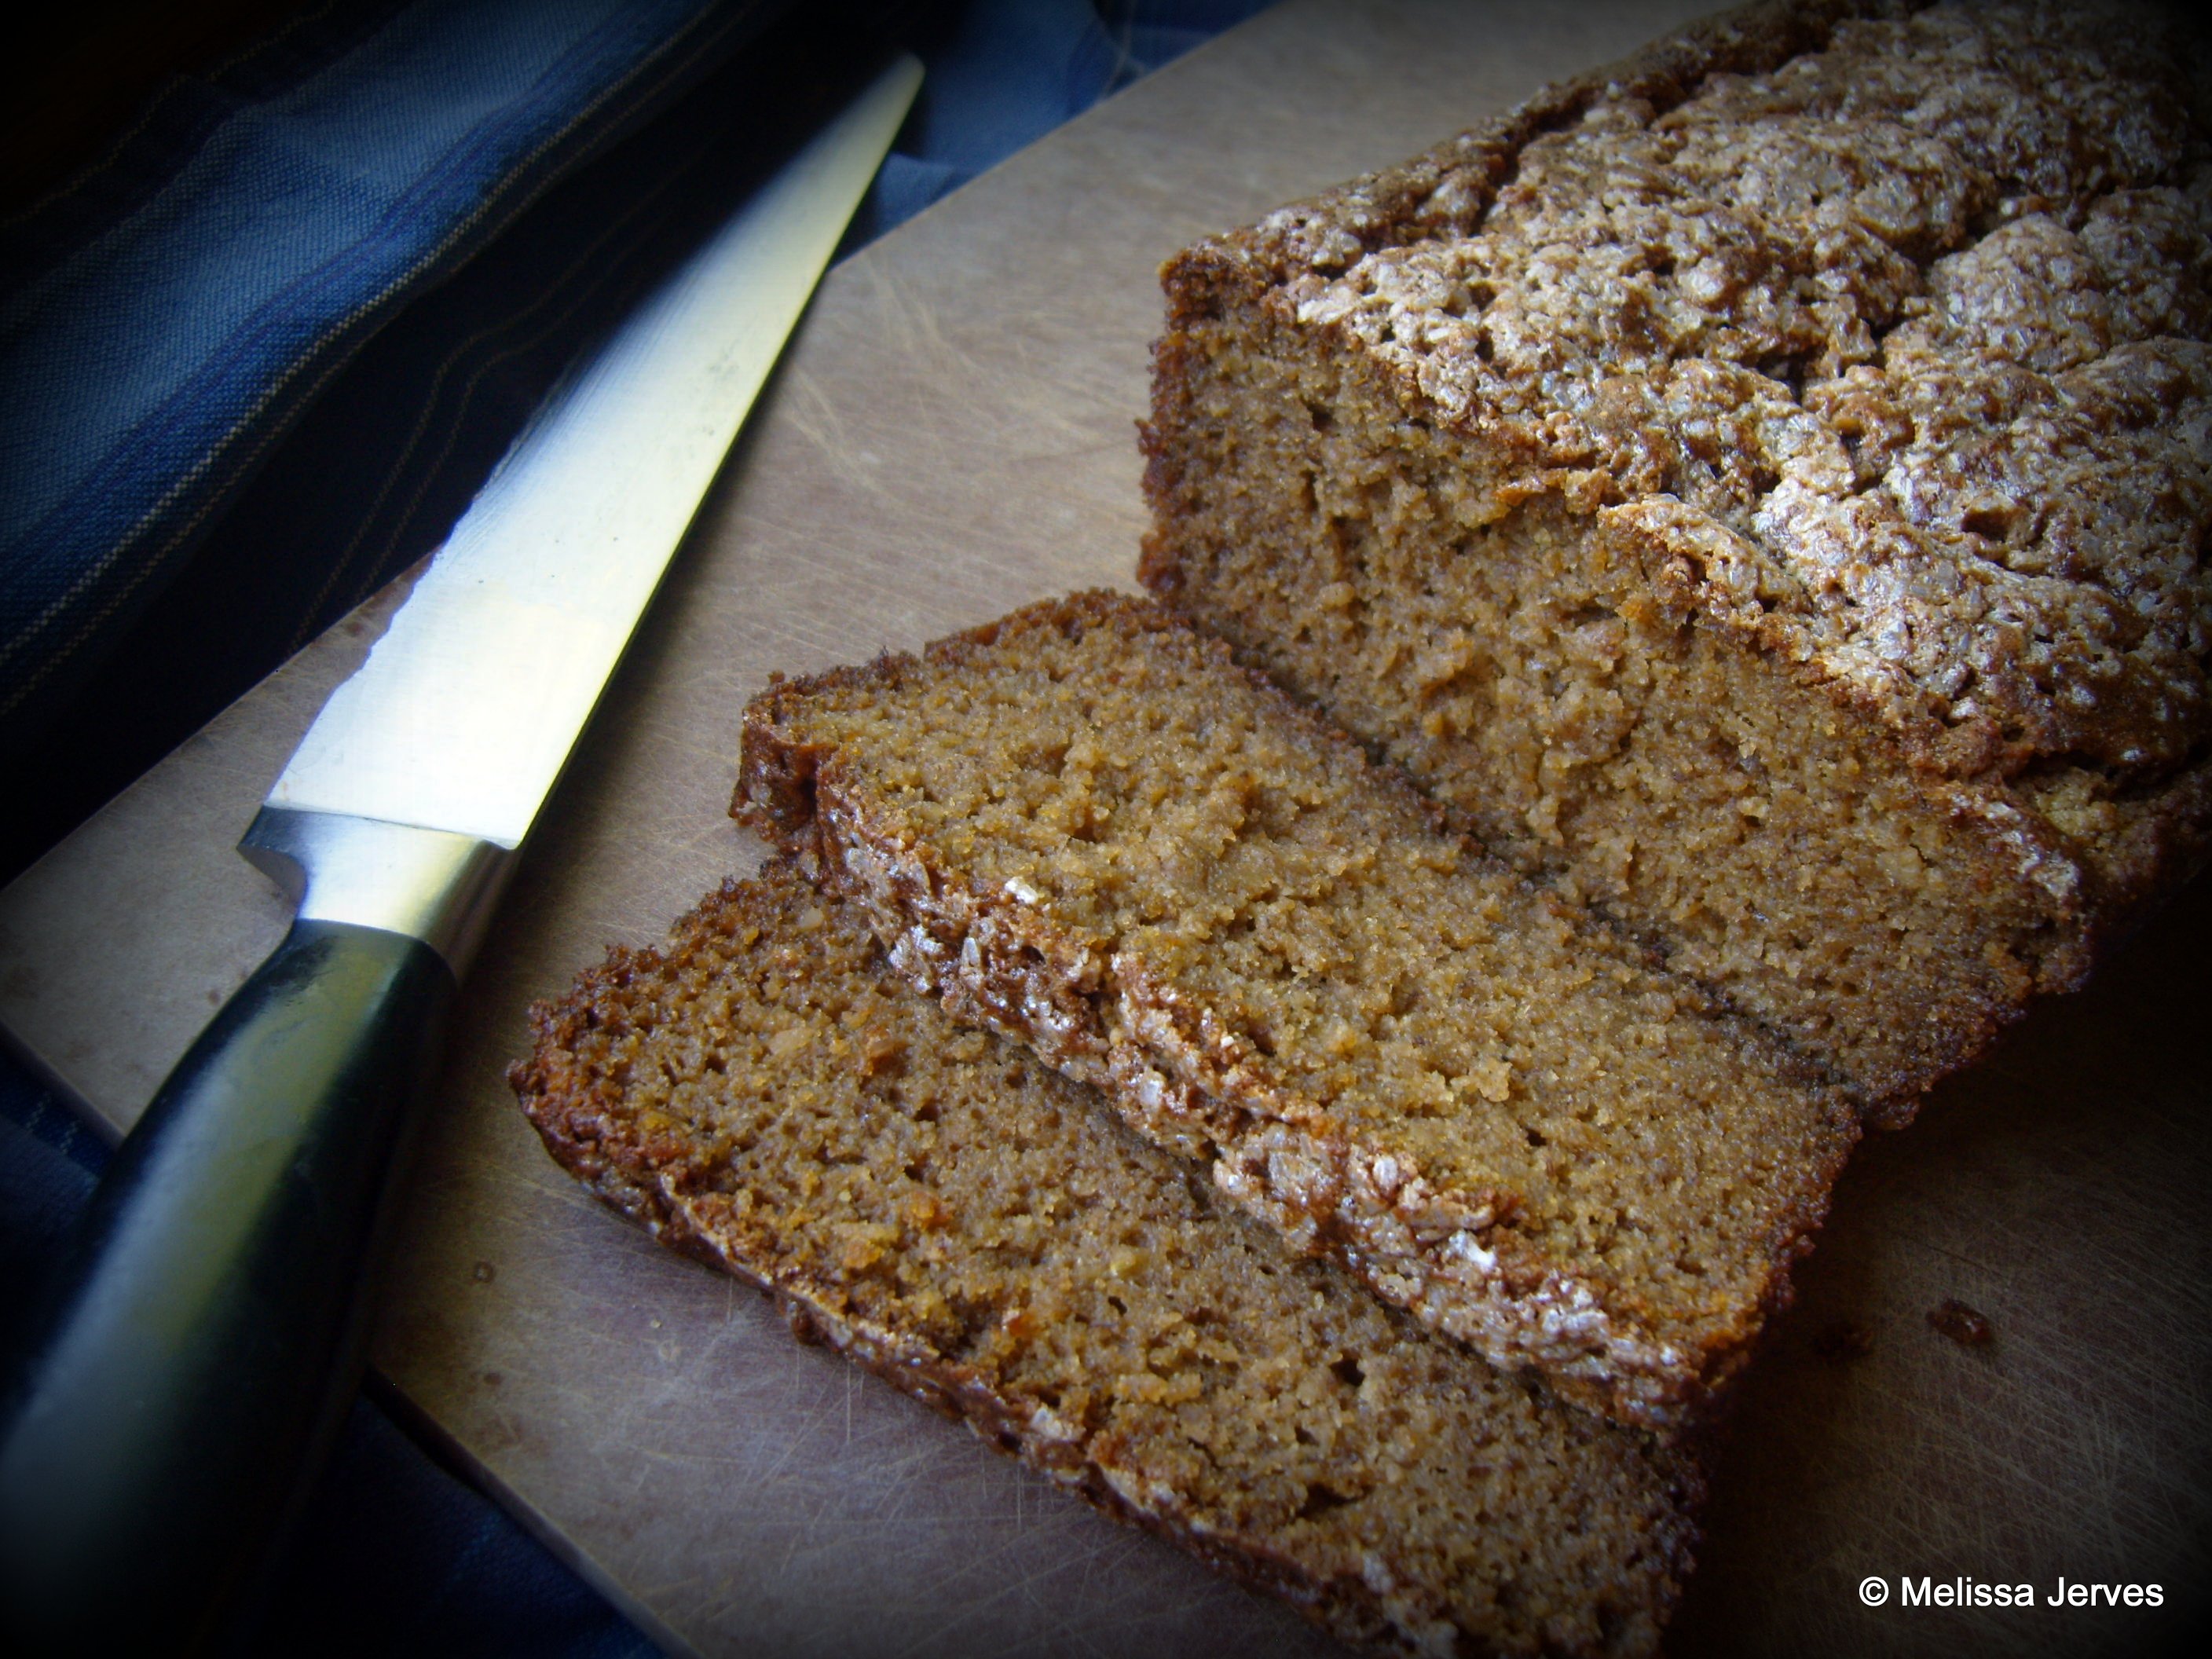
Fall is creeping in, and I’m thrilled. I found one stray can of pumpkin puree in the pantry, and decided it was finally close enough to fall to use it. My family doesn’t seem to tire of muffins or quick breads, even when I stuff them full of whole grains and fiber. I’ve been meaning to mix up a container of multigrain flour, ever since I stocked the freezer with a beautiful variety of flours some months ago. And since I’m trying to cook in greater quantity, but less often, I baked enough for a loaf to eat right away, and some muffins to freeze for lunchboxes and quick breakfasts. This bread is incredibly moist, with a complex, fruity flavor and something reminiscent of gingerbread. I am tempted to retest the recipe with less butter, since there is so much fruit to maintain the moisture. If you try, let me know how it goes!

This recipe looked so easy (mix the wet ingredients, mix the dry, mix them together–done!), but it needed some tweaking. If your ingredients are not all at room temperature, the butter will not mix smoothly into the wet mixture. I had cold eggs and overripe bananas straight from the fridge, and they didn’t play well with the softened butter. But if you cream the butter and the sugar together first, and then add the rest of the wet stuff, you’ll be fine. No extra bowls, either.

By the way, I finally acquired a kitchen scale, and I already love not having to use a slew of measuring cups. You can get along just fine without one, but I’m finding it more and more useful.

Multigrain pumpkin banana bread and muffins

adapted from King Arthur Flour

1 cup (8 ounces) softened butter

1 1/3 cups (10 ounces) brown sugar (I used dark brown)

6 Tbsp. (4 1/2 ounces) honey

4 large eggs

2 cups (15-ounce can) pumpkin puree

2 cups (16 ounces) mashed banana

2 Tbsp. (2 ounces) apple juice

3 cups (12 ounces) Multigrain Flour Mix (see below)

1/2 tsp. baking powder

2 tsp. baking soda

1 1/2 tsp. salt

2 tsp. ground cinnamon

coarse sparkling sugar to sprinkle on top

Multigrain Flour Mix

from Good to the Grain, by Kim Boyce

1 cup whole-wheat flour

1 cup oat flour (you can grind 1 cup rolled oats in the food processor)

1 cup barley flour

1/2 cup millet flour

1/2 cup rye flour

Whisk all the flours together in a bowl, then store in an airtight container.

Preheat the oven to 350 degrees. Grease the bottom of two 8 1/2″ by 4 1/2″ loaf pans (or one loaf pan and a dozen muffin cups).

Beat butter and brown sugar together. Add the rest of the wet ingredients and beat well.

In a medium bowl, whisk together the multigrain flour, baking powder, baking soda, salt and cinnamon. Add to the wet mixture and stir until just combined.

Fill the muffin cups 2/3 full of batter; then fill the loaf pan (it should also be about 2/3 full). Sprinkle the coarse sparkling sugar on top of both.

Put both pans on the middle rack of the oven. Bake the muffins for 15-20 minutes, until a toothpick inserted in the center comes out clean and the edges look browned. Remove and cool completely in the pan on rack. Move the loaf pan to the center of the oven and bake for another 35-55 minutes. Cool completely in the pan.

Monday Menu

Those cabbage rolls I was going to make last week? Too ambitious for a weeknight. I ditched the plan and made grilled cheese sandwiches instead. The Hub made the cabbage rolls on Saturday (along with a Polish apple cake…mmm…) and they were worth the effort. (His effort, that is. My efforts on Saturday involved a paintbrush.) There was enough left for another full dinner, so I packed them into the freezer for another week.

This week we included one slow cooker meal (pot roast) and one meal created from leftovers (ragout made from leftover roast). Wednesday is the most complicated meal, but I’ll cook the barley in the morning. If you’re not home during the day, you could cook it the night before–it takes about an hour.

Monday: Sesame noodles, potstickers and edamame

Tuesday: Pot roast (slow cooker), mashed potatoes, broccoli

Wednesday: Chicken breasts with bay leaves, barley with carrots & scallions (Cook This Now), roasted brussels sprouts

Thursday: Beef ragout on pasta, salad

Friday: Pizza Night


Last week on Home Baked

Getting organized for homework and music practice

Monday Menu


What are you cooking this week? Share a meal in the comments!

Getting organized for homework and music practice

This is a project I should have tackled a month ago, but better late than never, right? Mr. Nine and Miss Seven, in fourth and second grades, have daily homework this year. Miss Seven and Little Four take piano lessons, and Mr. Nine is starting the clarinet in band. Now that the dust has settled on the first few weeks of school and lessons, we need to get organized.

I’ve been keeping the kitchen desk fairly clear, but today things seem to have piled up. I cleared off the desk–sorting, recycling, filing–and then moved on to the file boxes I have for each child. They were overflowing with papers from last year, most of it obsolete now. I kept the nicest artwork and a couple writing samples to keep in their files in the basement, and recycled all the old spelling lists, classroom newsletters and old book order forms. I even organized my own file box with labeled folders.


My last step was to clear the memo board and reorganize the important information so that we can see it and reach it. The kids each have a clip with their current week’s homework and any logs they need to fill out (reading log, math facts log, karate practice log). Finally, I found a basket to contain their math fact practice workbooks and flash cards. We use them every day, so they need to be accessible.

I added one last touch: a jar of candy kisses. I just read The Little Book of Talent: 52 Tips for Improving Your Skills, by Daniel Coyle. I’ve used several of the tips this week to help with piano practice, and the difference has been amazing. Tip #41 advises, “End on a positive note.” That is, give a small reward at the end of a successful practice. For Miss Seven, one candy kiss to put in her lunch box at the end of her morning practice has transformed her attitude. Instead of racing through her assigned songs, oblivious to the quality of her performance, she has willingly repeated sticky passages and improved her technique. (By the way, other tips have been equally effective and easy to implement. I highly recommend the book to anyone who needs some help learning or coaching a skill. Thanks to the folks at Dinner: A Love Story for recommending it!)